This is a remix of the amazing design by WillitPrint3D. The original design is fantastic but I wanted to simplify things a bit, I could not find the same motor and I didn't have brass inserts. Its also impossible to find imperial inserts or adapters in my country. I ended up redrawing some of the parts to suit my needs. Seems like the original was in imperial units so the metric equivalents are odd sizes - I have adjusted where possible.
My changes are as follows:
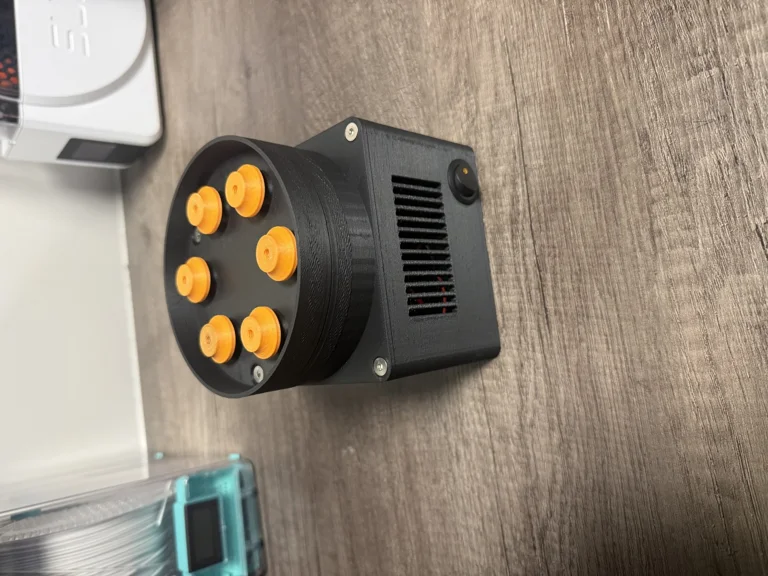
*Main housing*
I wanted to have a cleaner/simpler base, just a square without tool storage. I also wanted to remove the need for brass inserts, I am a fan of self threading hardware. Unless something is being fastened and unfastened regularly the self threading should work 100%.
I also modified the fan grill to print easier - in the photos you might see I had an accident and broke the grill already, I modified the file to be a bit sturdier.
*Gearbox Bottom Plate*
I updated the design to take a modular motor adapter. You can modify the CAD file and print and test as required without having to reprint the entire gearbox plate. I could not find a 37mm motor, but I could get a 250RPM 26mm diameter motor so my design will fit a 26mm diameter motor.
Also counter sunk the screw holes so I could use countersunk hardware for a cleaner finish.
*Tool posts*
It's impossible to find the 8/32 inserts in my country so I played around and found that my lazy self threading approach may work. I added a 8/32 UNC thread to the tool posts and it seems like it may work just like that. Your mileage may vary and you can always grab the originals if you want.
*Bill Of Materials*
-
Hardware
-
4x M4x8mm countersunk screw - to mount gearbox bottom plate to main housing.
- 3x M4x30mm countersunk screw + lock nuts - to secure the gearbox bottom plate.
- 3x M3x15mm cap head screw + lock nuts - to secure the motor adapter plate to the gearbox bottom plate.
- 4x M3x20mm cap head screw + nuts - to secure the fan to the main housing.
-
Parts
-
12x 608 bearings
- 1x 12 150-250RPM DC geared motor
- 12v Switch - I have a round LED switch
- 12v wiring
- Generic barrel plug/DC power adapter
- Flange coupler for your motor (4mm in my case)
- 40mm fan
-
Printed parts
-
One of each except;
- 6x Gear shafts
- 6x Tool Posts
- 6x Small Gears
*3D Printing*
I printed all the parts with the standard Prusa profiles for PLA except:
- Gear shafts - 100% infill, vertical orientation (short wide end down) with support material
- Main housing - painted on support for the switch hole and the DC power adapter
I feel it may be better to print the gear shafts and gears in ABS, ASA or PETG - something a bit tougher than PLA but I will see how far the PLA gears get me. Layer adhesion is critical for the gear shafts which is why I printed at 100% infill, I could not snap them with my hands at 100% but at 25% infill they broke easily.
*Assembly*
Clean up the supports.
Assemble the main housing with the switch, fan and DC power plug.
Fit 6 of the bearings into the gearbox bottom plate. Attach your motor to the adapter, attach the flange to the main gear. My flange gear worked as an interference press in fit from the other side. No idea if that's intended but it worked and I couldn't get it to turn to be able to thread in screws. My coupler also had a grub screw for the D shape motor shaft which I had to fasten. Fasten the adapter plate to the gearbox bottom plate with the M3x15 screws and some lock nuts.
Connect the motor to the rest of the wiring as described in the wiring diagram image and then secure the gearbox bottom plate to the main housing with the four M4x8mm countersunk screws.
Attach the small gears to the gear shafts and place them into the bearings in the gearbox bottom plate. Insert the remaining 6 bearings into the gearbox top plate and fit them over the gear shafts and line up the 3 mounting holes. Drop on the top plate and secure them all together with the three M4x30 countersunk screws.
Screw in the tools into the tool heads and pop them onto the gear shafts and you should be good to go.
Here is a link to my OnShape project should you wish to make any modifications:
Printables Tags: reloading